Sunday, January 19, 2014

Polish Review: NailCandy by Vee

I have five gorgeous polishes from NailCandy by Vee up on the blog tonight. I would have six, but I didn’t like how one of the polishes came out on my camera, so I have to redo the swatches and pictures. I want them to come out completely correct and when pictures are just a hare off it drives me nuts!

So first off I have Vamp

SONY DSC

Vamp is a luscious red jelly polish full of square, diamond, hex, circle and bar glitters in red, black, silver and white.

SONY DSC

This polish goes on like a dream.

SONY DSC

And it truly is VERY vampy.

SONY DSC

This is two thin coats of Vamp with a topper of HK Girl.

Next up is Think Pink

SONY DSC

Think Pink is a light pink jelly polish with matte pink and white hex and holographic bar and micro circle glitter polish.

SONY DSC

I have to say I instantly fell in love with this polish. It strikes me as a great Breast Cancer awareness polish and I will definitely use it as one in the future.

SONY DSC

On the pointer finger I have two thin coats of Think Pink. On the rest I use it as a topper over OPI I Think in Pink. I didn’t realize that was the name of the polish I used lol.

SONY DSC

SONY DSC

SONY DSC

Think Pink is a gorgeous little gem that doesn’t fail to stun.

Goddess is next:

SONY DSC

A glitter topper full of green, white and silver bar, hex and square glitters with little green moons interspersed, Goddess didn’t strike me as the prettiest polish in the world until I put it on my nails.

SONY DSC

Over white it just shines.

SONY DSC

And the little green moons, while they’re hard to get out, they’re so darned cute. I nearly squealed when I pulled one out.

SONY DSC

Next up is Pink Spark

SONY DSC

A gorgeous neon pink jelly with subtle holographic micro glitters.

SONY DSC

SONY DSC

This is three thin coats of Pink Spark with a topper of HK Girl.

SONY DSC

I love how juicy and sheer this jelly is!

Lastly I have Neon Purple up for ya….

SONY DSC

Gah I love purple polishes any way I can get them, and Neon Purple is a creamy, shimmery purple crème with a bit of holo for an added dazzle.

SONY DSC

This baby glides on perfectly with every coat.

SONY DSC

At first when you put it on, it dries matte, which in itself is a great look; but when you add a high shine topcoat it just pops.

SONY DSC

I seriously love this polish!

SONY DSC

All in all, these polishes are awesome. They apply effortlessly and have terrific coverage.

You can find Vee’s NailCandies at her Storenvy page. At $4 a pop, these polishes are a steal!

Disclaimer

Polish Review: Undefined Polish Val’s Vortex

Tonight I have a gorgeous jelly polish for you.

This deep purple jelly from Undefined Polish has to be one of the best jellies I’ve gotten my hands on in awhile.

SONY DSC

Designed with the shop owners twin sister in mind, Val’s Vortex is what she describes as a “deep purple jelly with matte white hex and square glitters along with holographic black micro glitter.”

SONY DSC

What she doesn’t state is how it will make all your purple dreams come true.

SONY DSC

This is three thin coats of VV with a generous topping of HK Girl.

SONY DSC

It is seriously drool worthy!

SONY DSC

I LOVE good jellies that just shine.

SONY DSC

And this one shines for miles!

You can find her polishes in her Etsy shop. They’re a little on the high side, but they are SO worth it! Don’t forget to show her some love on her Facebook page, as well!

Saturday, January 18, 2014

Witchy Stitches: Supplies You’ll Need to Hand Embroider

WitchyStitches

Well hello there, my Witchie Poos! You’re joining me for the first installment of my Hand Embroidery tutorials, the most important one… Erm… One of the most important ones? The supplies you’ll need!

First off: Patience. Granted, I don’t have a lot of it, but you’re gonna need some. I tend to get in a zone when I embroider so my low patience level tends to raise up pretty high. But I tell you what… Sometimes I hit a snag, or a knot and I just wanna snap. That’s when I’ve learned to lay it down or in lost cases I give it to my mom to clear up the knot issue.

Second: Hoops. I find it darned near impossible to do any kind of stitch work without a hoop. Maybe that’s why I don’t like hand piecing quilts. I just can’t get my hands to work with the fabric unless I have it in a hoop. The size of hoop you use depends on your project. If you have a relatively big project, you might want to consider a bigger hoop. But by no means does that mean that you have to use a big hoop for a big project. Sometimes it’s easier to use a smaller hoop on a bigger pattern and just move it around accordingly. The only drawback to that is that you will have to iron out your design when you’re done and if you have any complicated stitches, the hoop might distort them. I had that problem with one of my sisters’ projects. It squished out my satin stitching and didn’t ruin it, but made it look bad.

There’s TONS of different hoops; different shapes and different sizes.

SONY DSC

There are round ones, which are my hoop of choice. As you see there’s four different sizes of hoops from teeny tiny to pretty good size. I think it’s a 10” diameter circle if I’m not mistaken. You can get these hoops at any crafts store like Hobby Lobby, Michaels, Joanne’s, Hancock Fabrics etc. Even my local Walmart sells them now- which is awesome, especially when you think you’ve lost your favorite hoop and you need to replace it but can’t go the extra 45 miles it takes to get to the closest Hobby Lobby. Then you find it after you purchase a new one… Oops.
SONY DSC

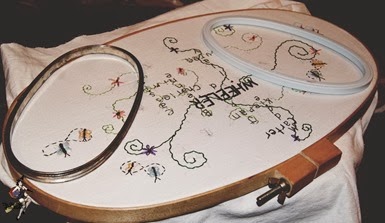
These are oblong hoops. While the smaller ones are ok, this bigger one is the bane of my existence. It is huge and bulky and heavy and cumbersome. But it works the best for this large family “crossword” piece I designed for my mom. Bigger is not always better, trust me. The smaller oblong ones work well for like sceneries and other longer projects. Would work great for a TARDIS… Hmmm…

No matter what hoop you use, you want to make sure that your fabric is big enough to span the entire hoop with a bit left over. Assure yourself on countless occasions that the fabric is taut enough in the hoop by gently pulling on the corners and straightening the fabric out. You’ll also find that you’ll need to tighten the bolt that secures the hoop together from time to time as the more you handle it, the more loose it becomes.

Third: Needles. You want hand embroidery needles. They come in a variety of sizes from relatively short to long with a teeny tiny eye. My favorite is about an inch and a half long and sharp as all get out.

needle

I’ve used it so much that it’s starting to tarnish a bit where I always hold it lol. I’ve tried using others, but this one is always my favorite. You’ll have to try a few out before you find one that really fits.

Next up: Thread.

Ok there’s a ton of different threads out there. From DMC who has pretty much the biggest collection of embroidery floss (or thread) out there; to JP Coats; to Sulky… You could get lost with the different types of thread.

I mainly use DMC (because I just recently found out that Sulky has thread- but I’ll get to that in a second) floss because it’s, in my opinion only, superior to other brands.

At DMC you can get regular floss in a HUGE variety of colors.

SONY DSC

As you can see… I have way too much… Plus I have skeins I haven’t wound onto spools yet. It’s a sickness lol.

SONY DSC

These are a few of the variations I have. I loooove these. They are soooo pretty to work with especially if you’re doing something like butterflies or flowers.

SONY DSC

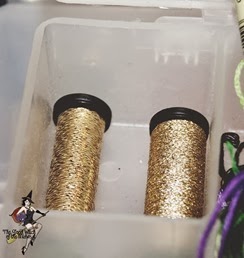
This is metallic thread… Which… I don’t suggest you try to use… Cause it’s a pain in the butt. I loathe this stuff…
SONY DSC

But I got two more spools in gold….

There’s also perle yarn from DMC but I have never used it. It’s more for tapestry or needle punch work. It’s a thicker weight floss and you can’t separate the threads.

In most embroidery you use three strands of floss together for your basic stitches, unless you want a thinner outline or thinner filling stich, then you use either two threads or just one. Embroidery floss is pretty easy to separate. You just start at the top and work your way down.

Next up is one of the most important aspects of your embroidery unless you have sharp, razor-like teeth. Your scissors. I opt for a small, hand-held type scissor, like these:

SONY DSC

They’re small, sharp and compact. Plus they’ve been in the family for… Eons? They fit comfortably into my hand and into my kit, so they’re perfect.

One of the most important aspects of embroidery are your patterns. There are NUMEROUS ways to transfer your patterns to your fabric and here are just a few.

Aunt Martha’s Iron on Transfer Patterns have long been the patterns of choice for handiwork. While sometimes it may be hard to find Aunt Martha’s patterns at places, you can buy them online by clicking the previous link. They’re easy to use and they’ve branched out from the cutesie kitschy dog and kitty patterns to more contemporary designs.

SONY DSC

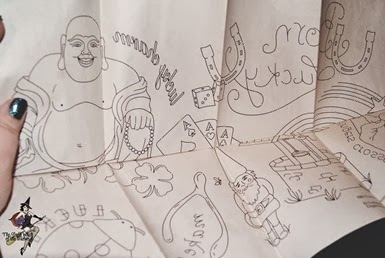
The bottom right and left are a subdivision of Aunt Martha’s patterns. They’re really cute and I’ve used them on numerous occasions. I have Aunt Martha’s patterns stashed here and there throughout my house. I just couldn’t find them all for the pictures lol. The middle is one I bought off of Etsy I do believe, purely for the Hedgehog design in it. The top two are patterns for quilting that my mom found in her stash that have embroidery designs in them.
SONY DSC

The patterns are printed on (usually) heavy weight paper in a heat transferable ink. All wording is backwards as if it wasn’t, it would transfer backwards on your fabric and ruin your design. Wouldn’t want that, huh?

If you can’t find a pattern like these for an idea you have, there is always alternatives. One of my FAVORITE places to get funky, retro and unique embroidery patterns is Urban Threads. They have both machine and hand embroidery patterns and most of their hand embroidery patterns are just $1. Plus they always have awesome freebies. You download the .pdf and print out. Simple as that.

You can also use coloring pages you can find with a google search. I use those a lot, or I use bits and pieces of more than one to create a completely unique design.

So how do you transfer the pattern from a piece of regular paper to your fabric? Well there’s numerous ways.

SONY DSC

You can use a transfer pencil, like this one from Aunt Martha’s. You have to press hard into your paper, and sometimes double or triple up your line. And then you have to spend close to 15 minutes trying to get it to transfer with your iron. Not exactly the most optimal for the busy embroiderer.

SONY DSC

This is a quilters marking pen. Used on fabrics, one end (The Disappearing Ink) disappears in the air after awhile. The Mark-B-Gone side disappears with water. I suggest using the Mark-B-Gone side before using the Disappearing Ink unless you’re a super fast embroiderer. These pens are good for hand drawn details.

SONY DSC

Lastly you have Iron-On Transfer Pens. These ones are from Sulky and while they’re not completely optimal, they’re probably your best bet. These work wonderfully well (when you get pens that work properly. Be careful of splotches and over-runny ink) if you plan on being extra particular on how much you cover. If you aren’t careful, the lines can bleed out and these pens don’t disappear. I really, really wish they did. But they are not water-disappearing like the red transfer pencil or the Mark-B-Gone pin. But like I said, they work GREAT.

Another important aspect of your embroidery is the fabric you use. You can pretty much embroider on anything and everything. Heavier fabrics work better than others as they don’t tend to separate when you put stitches in them. Lights work better than darks unless you have a chalk pencil to put down your design with.

A lot of times you can find quilt blocks or tea towels that have designs already stamped on them. Some are older, while some are newer more contemporary designs. These are fabulous, especially for the beginner.

You need to have a comfortable place to sit and do your embroidery. I sit in my grandma’s chair as it’s got a high back, relatively high arm rests (but not too high) and it reclines (I have to have my feet up when I’m going to be embroidering for a long time as my legs and ankles will swell). Plus it’s right next to my arm lamp which casts just the right amount of light on the sitiation. Yup I spelled that incorrectly on purpose. lol

So. This is your supply list! Keep your eye out, because sometime next week I’ll have step by step tutorials for your first in the series of stitches!

Monday, January 13, 2014

Polish Review: Hot Chick Physics Poodle Skirt

When looking for an off-beat, perfect color you don’t really think of the color Periwinkle. It’s more of an in the back of the closet, on a fuzzy sweater, the color of a cute little Prius color… Or so you thought.

SONY DSC

Poodle Skirt is a luscious periwinkle blue shimmery creme from the awesome gal over at Hot Chick Physics.

SONY DSC

Sorry for the awkward bottom bottle shot, I wasn’t able to get a good side shot without taking off the label. This stunning crème has an awesome shimmery shift to it that goes from purple to pink in the sun.

SONY DSC

Indoors, the shimmer is subtle, but it’s still there. It will definitely make a great base for all kinds of springy nail art!

SONY DSC

There in the sunlight you can see the shift a little better. It’s such an understated beauty.

SONY DSC

I mean, look at it! Such a stunner!

You can find Hot Chick Physics polishes at her Etsy shop. All of her polishes are in the mid priced range, and she has a wide variety to tempt your fancy. Also, go shoot her a line on her Facebook page as well!

Disclaimer

Thursday, January 9, 2014

A Proper British Meal

All things British really appealed to me as a kid… I mean, we had Monty Python… The Beatles… The Stones…  All the pithy British sitcoms on PBS like Are You Being Served?, Keeping Up Appearances, and then the Vicar of Dibley and of course, the veritable Doctor Who (My grandparents had a Doctor Who coloring book that I am pretty sure was prehistoric, that I colored in for years… Now I kick myself thinking about how collectable it would be now).
But for the longest time, us Americans made fun of the Brits. Hell, I made fun of Brits for a long time. Until my dad met and married a wonderful lady from across the pond and I got a whole new extended British family including two step sisters, a new grandma and grandpa and aunts, uncles and cousins that I wouldn’t trade for the world.
Now everything British is cool again. Doctor Who has made an awesome resurgence, British TV is taking over America and everyone is accepting and embracing all things British. People really should have taken my cue and did this years ago.
Why? Because… Their traditions are awesome and while everyone says that English food has no taste is smoking crack.
Today I have a proper British dinner on the blog, complete with Yorkshire Puddings!
SONY DSC
To start off, you want a good thick roast. You ideally want something a bit larger than the 2.5lb roast I cooked. I didn’t realize it was this small LOL. Oh well, it still made for awesome food.
SONY DSC
In a dutch oven, or roaster pan, melt three tablespoons of butter over medium heat.
SONY DSC
While it’s melting, season your roast with salt and pepper on both sides. When the butter is melted, place the roast in it to sear. Sear the roast on both sides and then stand it up on the other sides to sear evenly.
SONY DSC
Yummmm.
SONY DSC
Turn off the heat, place peeled cut up carrots, onion and some garlic in there. Sprinkle on some more salt and pepper. Cover and put it in the oven at 350 degrees for about 2-3 hours depending on how done you want. Medium Rare would be about 2 hours; well done would be about 3. I cooked my small little roast for 2 1/2 hours and it was perfect. Don’t forget to put about a cup of water in the bottom of the pan before you pop it in. Cover and let it cook until it reaches a roasty goodness that melts in your mouth.
SONY DSC
Now onto the Yorkshire Puddings. This is the tricky spot. The recipe will be at the end of the pictorial. Get your ingredients ready! And find your popover pan. Or just a regular non-stick muffin pan will work as well. I just like my fancy pans you don’t use for anything but that one certain thing LOL.
SONY DSC
Get your eggs in a bowl. Because you can’t whisk eggs on a plate. Well I guess you could, but it would be really messy.
SONY DSC
Now with your silly whisk that really doesn’t serve a purpose other than to look cute and get stuff stuck in it, whisk your eggs.
SONY DSC
Sift your flour. We can’t find our regular flour sifter, so we use this fine mesh strainer. It works well!
SONY DSC
Plus it looks REALLY cool when you take a picture at the right time.
SONY DSC
Mix your flour with your eggs.
SONY DSC
Then start mixing your milk in slowly, making sure all the lumps are gone.
SONY DSC
SONY DSC
And you wind up with this! Now carefully pour your mix into a measuring cup as it will be easier to pour from there than it would be to ladle from the bowl to the pan.
Take the roast out of the oven…
SONY DSC
UGH! It looks so damned good. Let it sit while the puddings are cooking. Drain some of the juices off into a bowl…
SONY DSC
A little drizzle from the skies of flavor town Winking smile
Take the drippings and put about a tablespoon each into the tin you’re going to use for the puddings. I forgot to picture that part. Put the pan into the warm oven and let it warm up for about 3 minutes. You’ll hear the sizzle.
Take it out and carefully pour the batter into the pans about 2/3 full.
SONY DSC
Put it in the oven for 20-25 minutes. 20 minutes was about the right time for mine. DO NOT OPEN YOUR OVEN until the timer goes off! It will cause the puddings to fall!!!
SONY DSC
You will be rewarded with these gorgeous, airy, yummy little confections that are just begging to be eaten.
SONY DSC
I mean, can’t you hear it?! Eaaaat meeeee!!! Eeeeeeeeeeeeeeaaaaaaaat meeeeeeee!!!
SONY DSC
Plate your roast along with the carrots and onions and drizzle the pan drippings on top of the roast.
SONY DSC
Then plate and enjoy! And believe me….
SONY DSC
You’ll enjoy it!
Now onto the recipe!
Yorkshire Puddings
1 1/4 c. flour
4 eggs
1 1/2 c milk
Preheat your oven to 450 degrees.
Beat flour into eggs until smooth and gradually add milk until lump free. Season with salt and pepper.
Place grease into tins. Heat in oven until hot (3 minutes or so).
Pour batter into tins to about 2/3 full. Place into oven for 20-25 minutes. DO NOT OPEN OVEN!!! Serve immediately.
This yields about six good sized Yorkshire Puddings.
PS.... I'd like to credit this recipe to my wonderful Auntie Lorna!