Showing posts with label Nail Polish. Show all posts

Wednesday, October 28, 2015

Nail Art Tutorial: Bloody Prom Queen Nails

One of my all time favorite, gruesome Halloween movies is Carrie. The original one. With Sissy Spacek.

tumblr_n2ci6aMqIQ1toamj8o1_250

It is the quintessential girl coming of age/embracing her inner rage story. If you haven’t seen it, you need to. Seriously.

tumblr_mgdocrEsuJ1s1wf1eo1_500 

So, to commemorate such an awesome movie, and an even more awesome character, I give you Bloody Prom Queen nails!

DSC_0330

Here’s what you’ll need: A pink polish; I’m using Wonderful World by Lyrical Lacquer. A black; as always, my trusty Carpe Noctem Under the Cover of Night. A red; I used Autumn Rubies by Bella Bosio. A silver for the tiara; I used White Gold Engagement. You’ll also need a topcoat, a dotting tool, a drinking straw and probably some latex clean up stuff lol.

DSC_0328

First up, lay down your pink polish and let dry.

DSC_0334

Put your latex cleanup aid on and let dry.

DSC_0336

Ok here’s the tricky part. Dip your straw in your red polish and dunk it over and over, to create quite a big blob on the end of the straw. Then taking it and quickly placing it a little above the nail your working on, blow hard and fast. It may take a few times to get it right.

DSC_0340

You’ll end up with this awesome splatter effect eventually.

DSC_0343

You could just leave them like this. Because seriously, it’s kick ass.

DSC_0344

On your thumb and pinky finger, create a bit of a “scroll” like shape that will “connect” when you put your fingers together. Let dry a bit, then add Prom on your thumbnail and Queen on your pinky.

DSC_0346

Using a dotting tool or toothpick and your silver polish, create a tiara on one of your nails (I used the middle nail).

DSC_0350

Top with topcoat and now you’re set to go wreak havoc on all the unsuspecting prom (or halloween) goers!

Nail Art Tutorial: The completely regrettable Jack Skellington nail art tutorial

So. Not all of my nail art tutorials are slam bang finishes. In fact, quite a few never see the light of day (or my editing program). This would have been one of them, but I had quite a few ladies on my Good Witch fanpage say that I should go ahead and post it. SO. I’m gonna.

DSC_0391

Here’s what you’ll need: Your go-to black polish of choice; I’m using Carpe Noctem’s Under the Cover of Night. A white polish of choice; I know I am showing an OPI polish in the picture, but I ended up using Zoya Purity instead. You’ll also need a topcoat, toothpicks, a dotting tool, makeup wedges and a latex clean up helper thingy; I’m using Cinema Swatch’s That’s A Wrap.

DSC_0411

Lay down a good coat of your black polish and let dry completely.

DSC_0413

Using your makeup sponge, create a radial gradient (it’s a lot easier than it looks. It may just take a few times). Press it onto your nails and repeat a few times to get the opacity you’re looking for.

DSC_0415

You’ll end up with this awesome faded look. Turned out pretty wicked, if I do say so myself.

DSC_0417

Then, using your dotting tool or toothpick, create what kinda looks like an oval or squished pumpkin or weirdly shaped skull. It really doesn’t look a thing like Jack Skellington’s head. At all. In the slightest. I need some better nail art brushes. Grrr.

DSC_0420

If you want, you can add some spiderweb decals, or paint them on yourself.

DSC_0423

Then using a toothpick and your black polish, paint on Jack’s face, a little spider falling from its web and a spooky BOO! on one nail. And now you have a Jack Skellington nail art that looks like a two year old did it. Pffft.

Nail Art Tutorial: Sleepy Hollow Nails

This. Is. AWESOME! I love how this look turned out and I hope y’all do too!

DSC_0356

Here’s what you’ll need: At least three polishes for the sunset gradient. You can use only two, but I think it adds a little depth to it with three. I used all Stached Lacquer polishes: Lovely Luna’s Livery, Orodruin and Pursue ALL the Knowledge!. For the clouds I used GG Polish Tin Man. For the black accents I used Carpe Noctem Under the Cover of Night. You’ll also need a topcoat, makeup wedge, tweezers and a tree decal (or you can do it by hand).

DSC_0361

If you want, mask your nails using a latex mask. I used Cinema Swatches That’s A Wrap! (last mani with it Sad smile )

DSC_0365

Ready your sponge. You want the lightest color at the base, then getting darker as you get higher.

DSC_0368

Sponge your gradient on your nails. One or two coats should be enough.

DSC_0373

Affix your nail decal (or draw the tree on) and dab on a little moon using your yellow polish.

DSC_0377

Using a little chunk of makeup wedge, dab on a little of the gray polish to create clouds on your nails.

DSC_0380

Awww look. Happy clouds!

DSC_0382

Using a dotting tool or toothpick, add some hills, tombstones and a blob that looks like a bat. The tombstones on the right look a little like a silhouette of Alfred Hitchcock. I totally didn’t mean for it to, but it really kinda does. Either him or Winston Churchill LOL

DSC_0387

Cover in a topcoat and voila! Some super spooky sleepy hollow nails! And they shine like diamonds!

Thursday, October 15, 2015

Thursday Tutorial: Zombie Nails

OK. I’m not a huge fan of zombies. There I admit it. That’s one fad that’s never stuck with me. Not sure why. These nails could also be considered as biohazard nails or nuclear meltdown nails or what have you. Or maybe even super villain nails. Cause they get turned into super villains due to toxic spills, right?

Supplies You’ll Need:

DSC_0251

You’ll need a black base coat, I used Carpe Noctem’s Under the Cover of Night (LOVE this polish, seriously!); Poison Apple Cosmetics Zombie Tears, Mi Chiquita, Icy Air and Cherryberry Kiss (not pictured); a white polish (I used Zoya’s Purity); a matte topper, I used ButterLondon’s Matte Finish topcoat; and a high gloss topcoat of your choosing. You’ll also need a dotting tool or some other kind of nail art brush.

DSC_0258

Apply your basecoat and let dry thoroughly.

DSC_0259

Matteify one of your nails to use as an accent nail. Then, using your dotting tool and the white polish, create some drippy looking ooze spots on your nails. I tried doing this with just Zombie Tears, but it didn’t work, there’s no way to make it opaque enough to go on by itself. Doing it this way, you get a more vibrant opaque green that looks pretty freaking wicked.

DSC_0262

Tapping one of your fingers in the shimmer polish (I used Icy Air for this), remove most of the excess polish. Using a steady hand, press your finger to your matte nail and lift straight up. Voila. Instant creepy fingerprint nail.

DSC_0263

On a separate nail, paint a strip of white across it.

DSC_0268

Color with yellow and then dribble some “blood” on top, making it drip down onto the “tape”.

DSC_0274

Add a few layers of green to your white blobs until you reach the opacity you want. When done and dry, apply topcoat.

DSC_0278

Write out CAUTION, or… If you’re like me… CAUTIN cause…. I couldn’t get the whole word on the nail… Cause I’m special…. Topcoat.

DSC_0284

And VOILA! Perfectly creepy, oozy zombie nails that are sure to get some attention!

DSC_0287

DSC_0292

Grrr that picture turned out crappy.

Tuesday, October 6, 2015

Polish Review: Lyrical Lacquer

WOOO!!! Yet another review for you! Today, I’d like you to meet Jamie, the mastermind behind Lyrical Lacquer with my Good Witch Q & A!

GW: What are your favorite sources for inspiration?

GW: What are your favorite sources for inspiration?
LL: I try to draw inspiration from everything around me, whether it be art, fashion, photography, classic toys, movies, or even books. I am also a huge musicophile and our brand is heavily influenced by music of all kinds.


GW: Where does your creativity stem from to allow you to come up with an array of colors and possibilities?
LL: I have always had an artistic flair. As a kid I was able to take art theory classes at a local art museum and then painting classes soon there after. I love painting, doing needlework and cake decorating, all of which come into play when working on new collections. When preparing a collection I put together an inspiration board. I take whatever is visually inspiring me and put together some color swatches that go with that particular theme. Then I put some songs in a playlist and see what fits together.


GW: What do you love about making polish?
LL: I love being able to make a color that I can be proud of. I like being able to expand my personal collection of polish with colors I wish I could find in stores and share them with everyone. It's very gratifying when someone likes what you create.


Q: If someone copies one of your polishes, is that flattering or insulting?
LL: This is a complicated question with a complicated answer. On one hand, I would feel flattered that someone liked it enough to dupe one of my polishes. On the other hand, I have seen major brands mimic indie polishes and it bothers me. Indies work so hard to make a name for themselves and provide the community with much need innovation. Even the swatching and nail art community have had their work copied by major companies. I understand that to survive you have to be relevant and follow current trends but there comes a point where you aren't creating anything new, just poaching from others. Again, it is a complicated situation.


Q: What made you start making polish?
LL: I have been collection polish since I was a little kid. Some time in high school I realized it had become an obsession when I ran out of places to put my growing stash. When I got older, my tastes became more sophisticated and before you knew it I was buying all the new collections of CG, OPI, Zoya, etc. and my stash grew to over 1500 bottles. I have way too many helmers full of polish! I set out to swatch them on wheels so I could find colors easier and I realized I had a lot of dupes. I slowly became disenchanted with mainstream polish because it felt like everything was old news. It was then that I found indies and it was love at first sight. I knew then that I wanted to be part of the indie community and create polish that I hadn't seen elsewhere.


Q: What are some of the new polish trends going around that you like and what are some that you cannot stand?
LL: Nail vinyls are amazing. I have a rough time with nail art and vinyls make it so easy! I also really love a good gradient mani and foils. I am not a fan of flared tips or bubble nails. I like a classic nail shape so some of these crazy acrylic designs are really not my thing.


Q: Do you have anything awesome in the works for your customers?
LL:
This fall we will be releasing a collection inspired by my favorite movie, The Nightmare Before Christmas. It will feature our first thermal, glow in the dark, and scented polishes. We are also working on branching out into vegan friendly skin care with F.A.C.E. by Lyrical. The line will offer items like sugar scrubs and cuticle balms to start off. Look for them some time in 2016!


Q: Lastly, what type of base coat do you use or suggest? As well as top coat?
LL: I never used to use a base coat. If I did I just used any old top coat as a base coat. It wasn't until one of my favorite polishes stained my nails blue that I religiously started to use a base coat. As silly as it sounds my favorite base coat is my own as I find it great for everyday use. I also like Zoya Anchor base coat and Julep Oxygen base coat.
For top coats, it depends on the look I am trying to achieve. I use my own when I want something to dry quickly but still have the wet look. I like Julep Freedom Polymer top coat because it performs like a gel and gives my soft nails some strength. If I am looking for a little bling I use INM Out the Door holographic top coat. I also really love Glisten & Glow HK Girl for long wear and shine, especially over glitter polishes that need leveling out.

Alrighty! Onto the polishes!!!

DSC_0140

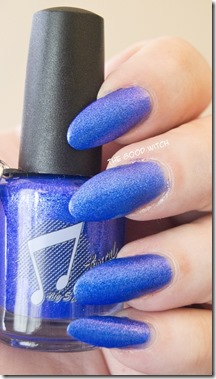
First up is Juicy! Listed as a semi-matte, this beautiful jelly polish is a mesmerizing mix of blue and purple shifting flakies.

DSC_0142

DSC_0175

This is two coats of Juicy without top coat. I absolutely LOVE this polish, and it’s lighter counterpart as matte. For some reason I just gushed over it while I was swatching!

DSC_01752

DSC_0144

Sky’s the Limit is another semi-matte beauty! Jamie lists it as an “electric blue polish with gold shimmer and a lime green flash. It dries semi-matte and needs top coat to truly shine.”

DSC_0147

Again, it’s chocked full of flakie gorgeousness!

DSC_0178

And again, I left it mattefied. And it’s sooooo pretty!

DSC_0186

And it’s still sooooo so so so shiny!

DSC_0149

Next up is Wonderful World. The most quintessential neon bubble gum pink polish I think I’ve ever come into contact with.

DSC_0157

I mean! GAH! For some reason it came out not so neon and more Barbie pink on me, but I’m one shade darker than clear, so that probably has something to do with it.

DSC_0162

I have to say though… I am totally and completely in love with it though.

DSC_0151

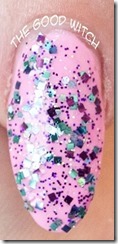
Lastly, I have Rich Girl. Listed as a topper that includes “sapphire, amethyst, berry, teal, charcoal and silver holo glitters packed together,” Rich Girl is an awesome topper!

DSC_0153

Unfortunately my camera was being a complete and total dingleberry and this was the best shot. I’ll have to get another shot later on!

DSC_0167

But like I said, it makes an excellent topper. I created a gradient on all but the middle nail, where I just put a full coat of glitter.
DSC_0171

It’s so pretty, I think I’m gonna die!!! Open-mouthed smile

All of these beauties are made from a fantastic formula. Dry time is non existent, especially with Sky’s the Limit and Juicy. I tried to do some nail art using some vinyls with the two but man… Never knew how bad I sucked at that LOL. I’ll try again sometime in the future now that I’ve stepped away and hopefully won’t kill anyone LOL.

You can find these beauties in Jamie’s Etsy shop for $10 each. They’re listed in the mid-price range of the Indie Designer list and well worth the price. She has SO many other ones and honestly, can’t wait to see her Halloween collection. It sounds phenomenal! Also, make sure to like her Facebook page and show her some love.

Disclaimer