Sunday, November 24, 2013

DIY Corner: Shabby Chic Luminaries

So I got a wild hair and decided to do some DIY Christmas decorations for outdoors. I had some leftover mason jars from a previous post, so I decided to get a second life out of them.

SONY DSC

Here’s what you’ll need:

1. Flocking, Santa snow, that powdery crap you put in your windows to make them look icy- either way you put it, you’ll need a can of it.

2. Paper, could be copy paper could be scrap paper. Either way, you’ll need it.

3. A pair of scissors. All I could find were my daughters scissors from last year.

4. Lash glue or any other kind of adhesive.

5. Mason jars of any size or shape.

6. Battery operated tealights. (not shown)

SONY DSC

Step One: Cut your best snowflakes and unfold them. Using a light amount of lash glue, glue on the edges and in the middle. Don’t use a ton, because then it will smear out and look gross.

SONY DSC

Step Two: Lay your snowflakes on the mason jars the way you want them to lay.

SONY DSC

Step Three: Using a LOT of newspaper to cover your work surface and background, and holding the can of flocking at least 10 inches away from the jar. If not you’ll have a big globby mess of flocking like I do in the middle of the snowflake.

SONY DSC

Step Four: Then CAREFULLY remove the snowflakes from the jars while the flocking is still wet.

You’ll want to let your luminaries sit out for at least a day or so to become completely dry and when you do decide to pick them up and move them be VERY careful as they will flake off.

When you have them where you want them, insert the battery operated tea lights and voila! Cheap and cute DIY luminaries!

SONY DSC

Here they are paired with my “shabby chic” Christmas tree on my front porch. I put a couple of my prop suitcases in the corner, put the tree on it and covered the base with a gorgeous, but falling apart lace table cloth. Next to the suitcases are some old, faded, vintage Christmas ornaments in glass vases. I bought a couple of old Christmas ties at a flea market and cut them up to make bows for the Christmas tree and used lace as the “garland”. The most expensive part of the setup is the Merry Christmas banner, but I reused it from my Christmas minis from last year. Pretty darned cute, if I do say so myself.

SONY DSC

And I used the flocking to put a little “frosting” on our front door (notice the streak marks left by my dear, sweet daughter. *grumbles*).

SONY DSC

Such a cute and inexpensive way to decorate. And when you’re done with them, you can simply wipe off the flocking and store for next year!

Nail Art Tutorial: Burberry Inspired Nails

I LOVE Burberry scarves. I don’t own one, but I covet them. Like the outfit that the gal in How to Lose a Guy in 10 Days got for her dog and the scarves for them? LOVE. I dunno why, but I really like the pattern and color scheme.

So when I think of fall and plaid, the first thing I think of is the Burberry pattern, and I decided to do a Burberry design inspired by it. Didn’t quite turn out the way I wanted them to, but that’s usually the way it is LOL.

SONY DSC

Supplies: You’ll need four different polishes. You’ll need a good black- I used Zoya Raven, my go-to. A red- OPI’s Moscow Red. A white- Zoya Purity and a tan color. I don’t suggest Orly’s Decades of Dysfunction (I think that’s the one, I put the nail polish up) as it’s not tan enough, it’s more nude and you need a more tan polish. But this one will work in a pinch. You’ll also need a nail art brush and a pallet.

SONY DSC

Step One: Apply at least two coats of your base polish and let it dry completely.

SONY DSC

Step Two: With your striping brush or nail art brush, put two vertical white lines on the left side of the nail. When you’re done with that, put two more horizontal lines crossing the vertical lines at the top.

SONY DSC

Like that!

SONY DSC

Step Three: Using the black with your nail art brush, put a black line between the first two white lines, then a line on either side.

SONY DSC

Do the same with the horizontal lines.

SONY DSC

When you’re doing this, use a light hand on the lines so they’re not as thick. I need to practice on my lines, for sure.

SONY DSC

Step Four: With the red, place a line to the right of all the other lines (this is where I’m saying a lighter hand would be better so it’s not so jumbled.) and one at the very bottom of the nail.

SONY DSC

Like this. Add your topcoat and you’re done. I really should have done thinner lines. This mani kinda sucks. Ugh.

Nail Art Tutorial: Argyle Nails

OK. Argyle is NOT one of my favorite plaids. Granted, I haven’t worn plaids since 2000, but it’s a very popular trend in nail art right now and I’ve been asked to do some plaid designs. So, here’s the first of two plaid nail art designs.

SONY DSC

Supplies: A gold or different shaded polish complimentary to your main two polishes. I used Orly’s Luxe. Two complimentary colors, one to use as a base, the other for the triangles on top. I used Zoya’s Jem and Stacy. You also need a chunky glitter, I used OPI’s Teenage Dream, but you really should use a bigger glitter. You’ll also need a dotting tool and a pallet. And paper towels!!!

SONY DSC

Step One: Paint your nail with your flat color and let dry. Then, using your second color, put a dot on the nail basically right in the middle.

SONY DSC

Using your polish, create two triangles, one on top of the other and then fill in.

SONY DSC

This is what you’ll get and hopefully yours will be a little neater than mine. I am REALLY rusty with my nail art, plus I was kinda shaky due to my blood sugar being low. So yeah… A cleaner line and fill would be key!

SONY DSC

Step Two: Using either a dotting tool or a nail art brush, take your gold, silver whatever color you’re using and create two intersecting lines. When you’re done doing that, kinda flip it over so the V is the other way and create your opposing lines.

SONY DSC

Step Three:

SONY DSC

Using your chunky polish and your dotting tool, pick up a bit of glitter and put it in the juncture of your lines for a little more definition.

SONY DSC

Use your cleanup brush and acetone and clean up your mistakes. Apply topcoat and you’re done!

SONY DSC

Not too shabby. Shoulda used a different shade of background. Ugh… Shoulda, coulda, woulda. LOL!

Nail Art Tutorial: Acorn Nails

OK…. I’m not a very good artist… I’m not a nail tech… I just like to play with my nails. A couple of you gals asked me for some fall themed nail art ideas, so this is what I came up with.

My sorry excuse for Acorn nails. Please, laugh with me LOL.

SONY DSC

Here’s what you’ll need: A dark brown and a light brown polish. If you don’t have those, you can use acrylic paint, like I did here. You’ll need black as well. Again, I used acrylic paint. You’ll also need water and a detail brush (water if you’re using acrylics) and a pallet. Oh and paper towels. Cause I’m messy and I figure everyone else is too LOL.

SONY DSC

Step one… If you’re using acrylic, mix your dark brown with a bit of white to get a lighter shade like I have on the right.

SONY DSC

Apply that to your nails, don’t worry if it gets kinda streaky or lined. Acorns aren’t perfect either Smile.

SONY DSC

Step Two: Take your lighter brown and white and mix up a color a shade or two lighter than your base color. I had to add a little dark brown into this because the light brown had a pretty orange-y shade to it.

SONY DSC

Step Three: Using that lighter shade, create a half moon on the tips of your nails to create the caps of the acorns. You can make a scalloped cap like I tried to on the left, but it was a hassle so I just went with straight edges.

SONY DSC

Step Four: Using a darker brown, create a shade line on the bottom edge of the cap. Then take your black and make black lines to create the hatch marks on top of the cap. Had I been thinking, I would have used a light white/tan color to do it. I don’t always think. Once you get one set of lines, go back and do the opposite to make your hash marks.

SONY DSC

Step Five: Add topcoat and you’re done!

SONY DSC

Like I said, not the best. But oh well. I gave it the ole college try Winking smile

Saturday, November 23, 2013

Happy Early Turkey Day! Turkakanis Majorus, in the house!

So with Mama Witch, Witchie Hubs and I having to work on the true Thanksgiving, we decided to go ahead and have turkey day last night. And MAN was it a trip LOL.

Ever since I moved out of my mom’s house, met hubs and had a family of my own I have never had the urge to cook a Thanksgiving dinner myself. Between all the families we had four different Thanksgivings to do before my mother-in-law passed away. That and I don’t really care for turkey.

I know, I know. Some of you probably gasped in absolute disgust. But honestly, I don’t like turkey. If I eat it, it’s the dark meat like a leg or perhaps the neck. LOVE turkey neck. Why don’t they serve that at fairs? So… If I don’t like it, why would I ever cook one? Yup. 32 years old. Been married for 10 1/2 years to a husband that absolutely ADORES turkey in any way, shape or form. Never. Cooked. A. Turkey.

Interesting. So I bought one.

SONY DSC

And I thawed it out in cold water for a day, then thawed it the rest of the way in the fridge.

Then I had to cut it open. I usually have a very strong stomach. Nothing ever really bothers me. But man, that blood pouring out of the bag was my undoing. Then I had to pick it up and rinse it out really good, and it undone me even more. I kept “Ewwwww”ing and blech. The feeling of poultry skin is NASTY lol.

SONY DSC

Once you get it out and rinse it REALLY good, pull the neck out and rinse it if you’re going to put it back in the turkey, which I did. Cause I like to eat the neck. Cause I’m weird. Then you have to pull out this plastic thingy in the middle which is REALLY hard to do and I almost flung the turkey across the room when it finally came loose.

SONY DSC

After you rinse it, make sure you pat it dry. Really good. Inside and out. Then you separate the skin from the turkey… Which is disgusting. It feels…. Wrong….

SONY DSC

And while you’re pulling the skin off, don’t forget to get the front part of the tata. There’s a little flappy of skin that you have to lift up and then you find this nice, disgusting package of giblets that you need to remove. That was such an unwelcome surprise LOL. I thought the bag I pulled out when I cleaned out the turkey was the giblets. NOPE. That’s them… BLECH.

SONY DSC

Then you need to play with your turkey. Make it feel welcome, needed, joyful. Get it up by the wings and dance it around the pan singing “Hello my baby, hello my honey!” ala Spaceballs. This step you can’t leave out.

SONY DSC

Then act like your head is attached to the turkeys neck. It will bring you closer to your food.

SONY DSC

After you’re done playing, stuff the celery, carrots and onions or anything else you’d like to stuff in the cavity… Man that didn’t sound right… And stuff it in there.

SONY DSC

Whilst doing this, you must expound and explain what you’re doing in a Julia Child accent and also you must hoot and holler whilst doing so. It sounds magical. Trust me.

SONY DSC

Then you have all your stuff in the cavity… Looks a little better.

SONY DSC

Now comes the fun part. Take your rings off or you’ll loose them in your turkey. Grab some butter, I’d say you’d want to do cold butter, because I let mine sit out and soften and it was EVERYWHERE except where I wanted it to be. Scoot this up under the skin, all the way to the front. Then cover the top of zee turkey in zee butter liberally. Coat that sucker like you were puttin’ sunblock on an albino.

SONY DSC

Yup. It’ll look like this. Paula Deen’d be proud.

SONY DSC

So…. We figured something out… If you want to cook a turkey in a couple hours, don’t put it in a roasting oven thingy. It won’t cook it as quick as a regular oven. So we had our turkey in here for a good three hours before we decided to throw it in the oven and cook it the rest of the way that way. Oh, and also, we put it in an oven bag, which really helps keep all the juices in and stuff.

SONY DSC

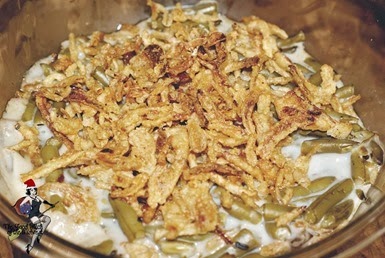
While you’re waiting, you can make some green bean casserole and let it sit for awhile. Two cans green beans, 1 can cream of mushroom soup, 1/4 c milk, a teaspoon of soy sauce, a dash of pepper and half a can of french fried onions. Mix all that up in an oven proof bowl and cover with more french fried onions. Cook for 25 minutes (or until golden on top and bubbly on the sides) at 350. And voila. Best green bean casserole EVAR.
SONY DSC

The finished product. So freaking good, creamy and YUMMY!! I even got my non-green anything eater husband to eat a spoonful!

SONY DSC

You can also get your yams ready. Or sweet potatoes, whichever you want to call them. I use Bruce’s yams, they’re canned and they are SO good. Drain them good, throw in to a dish. Cut off two or three tablespoons of butter or margarine and sprinkle generously with brown sugar. Cook same time and temp as green bean casserole. When done, let cool a little bit, then cover in marshmallows, put back in the oven and let the marshmallows brown up some. You can also use the broiler, but keep a very close eye on them.

SONY DSC

The finished product before applying marshmallows.

SONY DSC

Remember to keep an eye on the turkey. If you notice, the little popper thingy popped out on ours. I let it cook for a good thirty minutes after that just to make sure that it was all the way done. To be even doubly sure, stick a meat thermometer in the meatiest part of the turkey, nowhere near bone and test the heat.

SONY DSC

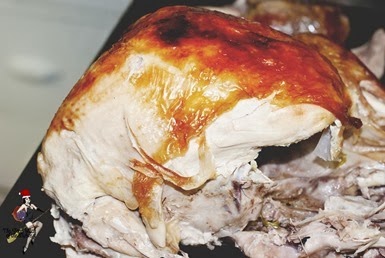
Enjoy the crisp, golden skin and delicious smells as it sits and rests for a good 15-30 minutes to retain the juices (and keep you from getting worms- as the mom in Christmas Story tells the Old Man repeatedly).
SONY DSC

Be careful when you go to transfer it to your serving tray (or in our case cookie sheet) because you’ll more than likely loose the wings and a leg or two LOL. That was a bit of a shocker.

We used an electric knife to cut ours after it rested. Ok. Well, Mama Witch used the electric knife, I’m not allowed to. Something about not trusting me or something…. *grumbles* We got a fair amount of meat for dinner (including a leg and the neck for me!) and Mr. Witchie-Poo got to have enough breast left over for turkey and soy sauce for the next couple of mornings. Don’t ask, it’s gross LOL.

SONY DSC


Check out that spread… Green bean casserole, cranberry sauce, rolls, yams and stuffing. YUM!

SONY DSC

Don’t leave out the corn and the homemade mashed potatoes, which we hardly ever get to have due to the extreme amount of work that goes into them.

SONY DSC

My happy plate for a very happy belly!

I was so pleased that my first foray into the world of turkakanis turned out so awesomely. It makes me happy to know that if I ever had to, I could definitely turn out an awesome, crispy, juicy turkey. Glad you guys stuck with me this long lol have a great Thanksgiving and keep an eye out for more recipes AND nail art tutorials that I’ll be pumping out in the next few days. Including a recipe/tutorial for my mom’s Oh So Special Pie!