Showing posts with label Halloween. Show all posts

Wednesday, October 28, 2015

Nail Art Tutorial: Bloody Prom Queen Nails

One of my all time favorite, gruesome Halloween movies is Carrie. The original one. With Sissy Spacek.

tumblr_n2ci6aMqIQ1toamj8o1_250

It is the quintessential girl coming of age/embracing her inner rage story. If you haven’t seen it, you need to. Seriously.

tumblr_mgdocrEsuJ1s1wf1eo1_500 

So, to commemorate such an awesome movie, and an even more awesome character, I give you Bloody Prom Queen nails!

DSC_0330

Here’s what you’ll need: A pink polish; I’m using Wonderful World by Lyrical Lacquer. A black; as always, my trusty Carpe Noctem Under the Cover of Night. A red; I used Autumn Rubies by Bella Bosio. A silver for the tiara; I used White Gold Engagement. You’ll also need a topcoat, a dotting tool, a drinking straw and probably some latex clean up stuff lol.

DSC_0328

First up, lay down your pink polish and let dry.

DSC_0334

Put your latex cleanup aid on and let dry.

DSC_0336

Ok here’s the tricky part. Dip your straw in your red polish and dunk it over and over, to create quite a big blob on the end of the straw. Then taking it and quickly placing it a little above the nail your working on, blow hard and fast. It may take a few times to get it right.

DSC_0340

You’ll end up with this awesome splatter effect eventually.

DSC_0343

You could just leave them like this. Because seriously, it’s kick ass.

DSC_0344

On your thumb and pinky finger, create a bit of a “scroll” like shape that will “connect” when you put your fingers together. Let dry a bit, then add Prom on your thumbnail and Queen on your pinky.

DSC_0346

Using a dotting tool or toothpick and your silver polish, create a tiara on one of your nails (I used the middle nail).

DSC_0350

Top with topcoat and now you’re set to go wreak havoc on all the unsuspecting prom (or halloween) goers!

Nail Art Tutorial: Sleepy Hollow Nails

This. Is. AWESOME! I love how this look turned out and I hope y’all do too!

DSC_0356

Here’s what you’ll need: At least three polishes for the sunset gradient. You can use only two, but I think it adds a little depth to it with three. I used all Stached Lacquer polishes: Lovely Luna’s Livery, Orodruin and Pursue ALL the Knowledge!. For the clouds I used GG Polish Tin Man. For the black accents I used Carpe Noctem Under the Cover of Night. You’ll also need a topcoat, makeup wedge, tweezers and a tree decal (or you can do it by hand).

DSC_0361

If you want, mask your nails using a latex mask. I used Cinema Swatches That’s A Wrap! (last mani with it Sad smile )

DSC_0365

Ready your sponge. You want the lightest color at the base, then getting darker as you get higher.

DSC_0368

Sponge your gradient on your nails. One or two coats should be enough.

DSC_0373

Affix your nail decal (or draw the tree on) and dab on a little moon using your yellow polish.

DSC_0377

Using a little chunk of makeup wedge, dab on a little of the gray polish to create clouds on your nails.

DSC_0380

Awww look. Happy clouds!

DSC_0382

Using a dotting tool or toothpick, add some hills, tombstones and a blob that looks like a bat. The tombstones on the right look a little like a silhouette of Alfred Hitchcock. I totally didn’t mean for it to, but it really kinda does. Either him or Winston Churchill LOL

DSC_0387

Cover in a topcoat and voila! Some super spooky sleepy hollow nails! And they shine like diamonds!

Thursday, October 15, 2015

Thursday Tutorial: Zombie Nails

OK. I’m not a huge fan of zombies. There I admit it. That’s one fad that’s never stuck with me. Not sure why. These nails could also be considered as biohazard nails or nuclear meltdown nails or what have you. Or maybe even super villain nails. Cause they get turned into super villains due to toxic spills, right?

Supplies You’ll Need:

DSC_0251

You’ll need a black base coat, I used Carpe Noctem’s Under the Cover of Night (LOVE this polish, seriously!); Poison Apple Cosmetics Zombie Tears, Mi Chiquita, Icy Air and Cherryberry Kiss (not pictured); a white polish (I used Zoya’s Purity); a matte topper, I used ButterLondon’s Matte Finish topcoat; and a high gloss topcoat of your choosing. You’ll also need a dotting tool or some other kind of nail art brush.

DSC_0258

Apply your basecoat and let dry thoroughly.

DSC_0259

Matteify one of your nails to use as an accent nail. Then, using your dotting tool and the white polish, create some drippy looking ooze spots on your nails. I tried doing this with just Zombie Tears, but it didn’t work, there’s no way to make it opaque enough to go on by itself. Doing it this way, you get a more vibrant opaque green that looks pretty freaking wicked.

DSC_0262

Tapping one of your fingers in the shimmer polish (I used Icy Air for this), remove most of the excess polish. Using a steady hand, press your finger to your matte nail and lift straight up. Voila. Instant creepy fingerprint nail.

DSC_0263

On a separate nail, paint a strip of white across it.

DSC_0268

Color with yellow and then dribble some “blood” on top, making it drip down onto the “tape”.

DSC_0274

Add a few layers of green to your white blobs until you reach the opacity you want. When done and dry, apply topcoat.

DSC_0278

Write out CAUTION, or… If you’re like me… CAUTIN cause…. I couldn’t get the whole word on the nail… Cause I’m special…. Topcoat.

DSC_0284

And VOILA! Perfectly creepy, oozy zombie nails that are sure to get some attention!

DSC_0287

DSC_0292

Grrr that picture turned out crappy.

Tuesday, October 6, 2015

A Catch-Up with the Good Witch

Hello there, sweet Witchie-Poos! I’ve been kinda in and out in the blogging world for a bit. I hope to be catching back up and getting out of the funk that I’ve been in for awhile.

I’ve been super busy with everything that life has gotten a little crazy. But now I’m here to show you a little glimpse of what I’ve been up to!

DSC_0191

We’ve been taking more drives lately since gas prices have been down. Thank goodness! I was getting a little stir crazy!

DSC_0533

DSC_0558

DSC_0018

DSC_0635

These were taken out by the lake where we live. We’ve been granted some gorgeous sunsets as of late and I haven’t been taking advantage of them.

DSC_0727

Also got to do an alternative pinup session. It was awesome!!!

DSC_0908

Yup, those are the horns I made!

DSC_0942

DSC_0100

DSC_09332

And I also got to finish and post my first bridal pinup!

DSC_0074

DSC_0113

DSC_0197

DSC_0263

And I’ve got my Halloween decorations up for the most part. I do still have a few things to do, but they’re minor. But that’s or another post Winking smile

Tuesday, October 21, 2014

DIY Halloween Tutorial: Hanging Spirits

So… I’m a Pinterest freak. Seriously… It’s an illness. I saw a picture of these things on there and with a little sleuthing I finally found the tutorial for it. Lowe and behold, it was a Martha Stewart tutorial. I was amazed. I didn’t know the Domestic Queen could come up with something so cool and amazing. So… Sit back, read this and then go make some hanging spirits.

Supplies You’ll Need

DSC_0001

You’ll need some newspaper to lay out on your work surface if you’re a messy crafter like I am lol. Sponge brushes are the best tools to work with. You can also use just a regular paintbrush to help kinda push the cheesecloth into the nooks and crannies. You’ll need some cheesecloth. You can get this at Hobby Lobby, Michaels or Walmart. Scissors are a must. You’ll need however many foam heads you want. My sister got these for me over at Sally’s for super cheap (cheaper you can get them at Hobby Lobby!) and you’ll need Alleen’s Fabric Stiffener. This works awesome and you’ll definitely use a bit of it, so get the biggest bottle you can.

DSC_0003

Step One:

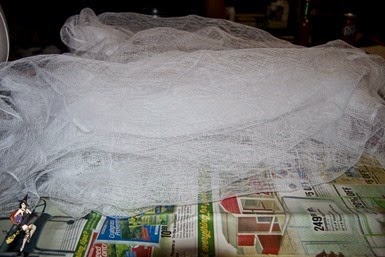
Cut your cheesecloth to varying lengths. Make some long, some short.
DSC_0004

Open it up and spread it out so you don’t have to do this when you’re right in the middle of everything.

DSC_0005

Step Two:

Get ready to get messy. Pour out a good amount of the fabric stiffener on a paper plate and have your sponge brush at the ready.

DSC_0006

Step Three:

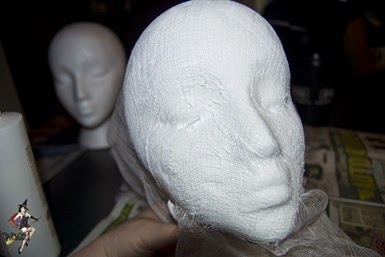
Drape your cheesecloth over the foam head. I usually start with a shorter piece of cloth at first and build up from there.
DSC_0007

Step Four:

Start glopping on your fabric stiffener. It isn’t going to look completely perfect, but it doesn’t really matter. They’re both white so it’s not really going to show. It is kinda hard to get the cheesecloth to stay in the hollows of the eye, but you just have to keep at it until it looks like you want it to.

DSC_0009

You’ll continue on with the rest of the layers of cheesecloth.

NOTE: You do NOT have to cover the entire head with the fabric stiffener. I use the seam of the foam head in the middle to judge where to start with it and then end right around the jaw line/chin.

You can put four to seven layers of cheesecloth, it is all a matter of how flowy you want it. I put four layers on each of mine and I’m pretty pleased with how it looks. But it probably could have used a couple more.

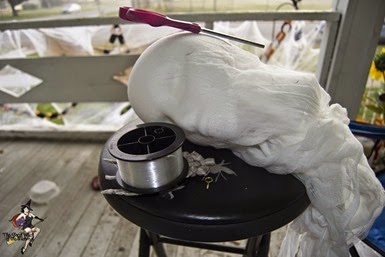
Now these things have to dry completely, and I mean completely. And it will take at least 24 hours, if not closer to 48. The more layers, the longer it will take to dry. It is some SUPER sticky stuff, so make sure wherever you put it, you don’t have to worry about it falling over or sticking to something.
DSC_0011

Step Five:

When you’re all done and everything is dry, then you’re ready to hang them! You’ll need some fishing line, a pair of scissors and eye hooks or eyelet screws.

DSC_0013

Be mean and give your foam head a headache by taking the eye hook and pushing it into the top of the head. If you’re planning on leaving this out for a few days (and I really don’t, because the fabric stiffener doesn’t react well with moisture) you might want to use a little epoxy or hot glue to make sure that the eye hook stays in there. Then string with fishing line and hang!

DSC_0018

DSC_0021

DSC_0023

Pretty darned creepy huh? I can’t wait til Halloween and I can put them all out. I think they’re really gonna creep people out. It’s gonna be fabulous. I will of course I’ll have pictures of the final setup!

Let me know if you make these awesome little ghoulies!